The Email Component is one of the great features of WorshiPlanner. Some churches have sent out in excess of 60,000 emails a year. The ability to personalize the emails makes its use valuable.
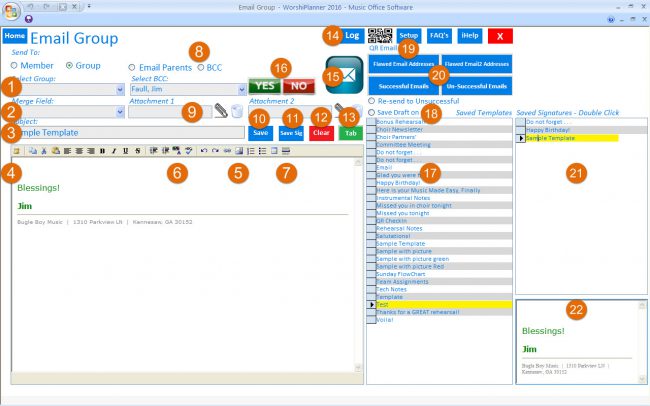
The Email Form by the Numbers
- Select Group or Member – the drop list contains a list of Groups or Members depending on which radio button is selected
- Merge Fields – click to add First Name, Connection Partner, or Member ID wherever the cursor is currently in the email edit area. When opened from the Atttendance form, it also includes merging a Personal Note that is written on the Attendance Marking form.
- Subject – This information is required to send an email.
- Email editing area – Data entered here is in HTML format. To view the code, click the left hand button on the form.
- Upload a graphic to view in the email – Large files will slow down the sending and opening of the email.
- Change the font colors, size, etc.
- Add Horizontal Line
- Blind Copy – When selected, a copy of the email will go to the Selected Member. This features simply send a copy of the email. A true BCC would send 100 copies if you had 100 in your group.
- Attach File 1 and 2 – Click the Paperclip to browse for a file to attach. Double clicking the Path in the field after attaching will open the file.
- Save Template – This saves a copy of the Email as a template to re-use.Save Template – This saves a copy of the Email as a template to re-use.
- Save Signature – Create Signature as an Email, then click here to save it in your Signature List
- Clear– This clears the editing area and subject
- Tab – Adds a tab to the Email text.
- Log – displays send history for Emails
- SEND
- NEW! Email Reply Buttons – Click here to create and use Reply buttons for Email or Newsletter forms
- Saved Templates – Click the Subject to edit or use this Email Template
- Save Email Draft on Close – Auto save current email
- Setup – Opens Setup Form for entering Email credentials and program password info.
- View lists of Successful or Unsuccessful Emails – also view lists of bad email addresses
- Saved Email signatures – Click to view or Double click to use Email Signature. Be sure to change the Subject
- Preview Pane for Email Signatures
Email Reply Buttons
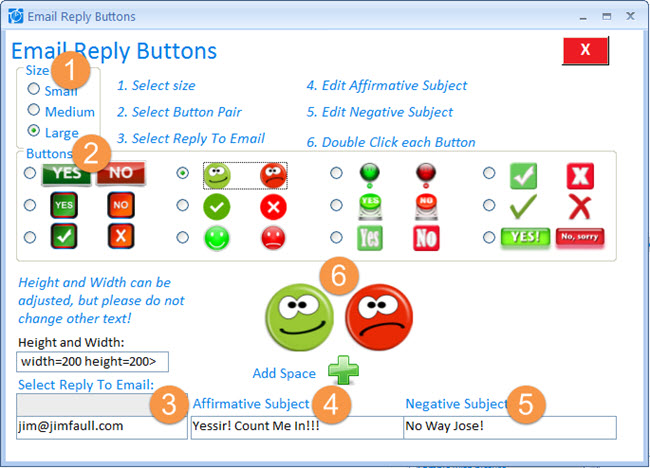
Email Reply Buttons lets you create and use various Submit buttons that will open the users’ email component with a preset Subject line of your choosing.
The Email Reply Form by the Numbers
- Select Size – Large, Medium or Small
- Select Buttons – Currently 12 sets of choices
- Type Reply Address or Select from the drop list of members
- Edit Affirmative Subject
- Edit Negative Subject
- Double Click button Choice
- Delete Emails Prior to a specific date – Select your date and click Delete
- Data Sheet View
- Sort Buttons for each column


